Thursday, April 30, 2015

Peanut Butter Banana Ice Cream Sandwiches

Peanut Butter Banana Ice Cream Sandwich

Well, this might just be my new favorite thing.  I combined two great recipes into one tasty ice cream sandwich.  I made some delicious peanut butter cookies with the recipe from Better Homes and Gardens and combined it with the one ingredient (literally, it's just bananas) banana ice cream from One Ingredient Chef to make a peanut butter banana ice cream sandwich.
Peanut Butter Banana Ice Cream Sandwich

Follow the directions on both of these sites, but once you make your ice cream, spread it into a shallow pan and refreeze.  Then, using a round cookie cutter and a spatula, cut the ice cream into circles, placing them between the cookies.  Refreeze again, and then enjoy!
Peanut Butter Banana Ice Cream Sandwich

I cannot wait to try other variations of this- the ice cream is so simple and delicious and creamy!  One of those rare Pinterest finds that turn out exactly as promised :)

Tuesday, April 28, 2015

Gold, Shining Love

Gold Love Paper Art


Sometimes, I'm amazed at the big statement a simple idea can have.  And when you have shiny, gold foil paper, you're bound to get some big returns on little ideas!

To make your own shiny love sign, you will need:

  • Gold foil paper
  • Heavy stock white paper
  • Plain paper for a stencil
  • Pencil
  • Scissors
  • Glue
Gold Love Paper Art

First, draw out your love letters onto some plain paper.  Use a ruler to make sure everything stays consistent.  Then, cut each letter out and lay them, overlapping slightly, onto the gold foil paper.  Holding the letters in place, quickly trace their outline with a pencil.  Cut them out, glue the down, and frame or hang wherever you need a little extra love :)

Gold Love Paper Art
Gold Love Paper Art
Gold Love Paper Art
Gold Love Paper Art

So simple!

Thursday, April 23, 2015

DIY Cork Inspiration Board


As if my addiction to Target wasn't bad enough, our local store recently upgraded its craft aisle.  You guys.  It's too much amazing.  And it's also where I got the idea for this project: this four pack of cork squares was just what I was looking for to make an inspiration board to hang over my craft area.
cork squares

To make your own, you will need:

  • 4 pack cord board
  • Gold paint
  • White paint
  • 1 inch wide flat paint brush
  • 3M wall hang strips

This was beyond easy to do, and it took me about 30 minutes from beginning to end, including hanging time!

First, you'll want to paint on a base stripe of white around the edges.  The cork is very absorbent, so you need the base coat to allow the gold to shine (pun intended).  Use your paint brush as a guide for the width.  If you're nervous about making straight lines, you can use painters tape.  But don't forget that, as with all things in life, it doesn't need to be perfect.  Then, once the white paint is dry, layer the gold paint on top.  That's it!

The best part is that you can hang these up with 3M strips!  (It's perfect for apartments and dorms!)
Crafting Table and polka dots
My little "office" area ... before
DIY Cork Inspiration Board
And my little area after!
DIY Cork Inspiration Board

I toyed with all sorts of design ideas: taped on patterns with spray paint over them, shapes, layers, etc.  But in the end, I thought that giving the boards the appearance of gold frames was best.  The end result is simple and pretty, and the perfect backdrop to display all your inspiration.  I've put up a recipe, a picture that gave me a DIY idea, an artist's post card, some love, a little bit of climbing inspo, and (of course) Rita Ora twirling in a field of flowers.

What's inspiring you lately?

Tuesday, April 21, 2015

DIY Rainy Day Bookmark

DIY Clay Umbrella Bookmark

If April showers bring May flowers, then we are bound to have bunches of  flowers!  I can't complain about all the rain, though, since we had such a mild and relatively low snow winter.  Whenever it doesn't snow much, I always worry about summer droughts, so I'm actually pretty happy it's raining!  Plus, all this rain gave me an idea for a bookmark.

You will need:

  • Purple polymer clay
  • Plain paper clip
  • Pointed tool

Massage your clay until it is soft.  Then, roll it into a ball.  Press and pinch it into a rounded half moon and, using your pointed tool, press indentations from the center downwards to form the wires of the umbrella.  Next, pinch of small pieces at the bottom of the umbrella, in between each line.  Use the handle of your pointed tool to smooth these out into crescents.

Finally, use the pinched off pieces to secure the paperclip to the back of the umbrella.  Bake at 275 degrees for about 15 minutes for every quarter inch of thickness.

DIY Umbrella Bookmark
DIY Clay Umbrella Bookmark

Thursday, April 16, 2015

Who Do You Follow?


I am looking for blog recommendations!  I want some more blogs to follow, so tell me what your favorites are.  I like craft and cooking blogs, but I really like fashion blogs.  I especially want to find some up-and-coming blogs (as opposed to the monster blogs everyone is following).

So, what do you recommend?

Tuesday, April 14, 2015

DIY Expletive Coffee Mug

DIY Expletive Mug


Because before coffee, an expletive is sometimes all you can muster.

DIY Expletive Mug

To make your own, you will need:

  • White coffee mug (IKEA is where I got mine)
  • Pink and black acrylic enamel paint
  • Straw
  • Sticker symbols (I found mine in an alphabet pack at Michaels)

Stick your expletive in the center of your mug.  Then, add a dot or two of paint to the surface.  Use your straw  to blow the paint around.  I did a few test runs on a piece of styrofoam just to get a feel for it, but be prepared for the paint to behave differently on different surfaces.

Keep adding paint and blowing it around until you like the general look.  Then, remove the stickers carefully.  Scrape off any unwanted paint that seeped under the stickers.  Finally, bake according to your paint instructions.  This will typically include a dry time along with heating your oven with the mug inside- this keeps the temperature from going from one extreme to the other too quickly, which may cause the mug to break.

Allow it to cool, and then enjoy your bleeping mug!

DIY Expletive Mug
DIY Expletive Mug
DIY Expletive Mug
DIY Expletive Mug
DIY Expletive Mug

Thursday, April 9, 2015

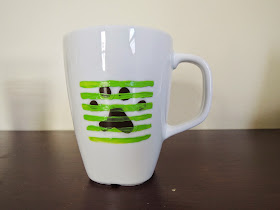
DIY Puppy Paw Mug

DIY Paw print mug

I love mugs.  If I had the room, I'd have a million!  Fortunately, they make great gifts, too.  So, even the ones I don't have room for end up in loving homes ;)
DIY Paw print mug

To make this paw print mug, you will need:

  • White coffee mug (try IKEA!)
  • Acrylic enamel paint in bright green and blue (or whatever colors you like!)
  • Paw print sticker
  • Scissors
  • Tweezers

First, take your paw print sticker and cut it out around all the lines.  Next, stick it to your mug- aim for the middle, but don't worry if it's not perfectly centered!  Then simply paint stripes over the paw print!  I started with my green and filled in with the blue afterwards.  This ensured that my lines stayed evenly spaced.  Use your tweezers to remove the stickers carefully, then touch up the paint if any peeled off.  Finally, follow the directions on your paint bottle for how to bake the mug.  Typically, you want to be sure and place the mug in a cold oven, then heat it to temperature while the mug is in.  This prevents any cracking from sudden temperature changes.
DIY Paw print mug
DIY Paw print mug
DIY Paw print mug
DIY Paw print mug
DIY Paw print mug
Ta da!  So simple!!

Tuesday, April 7, 2015

Eating Right

...and exercising.  Two things that I do not frequently feature on this blog.  I'm more likely to be sharing cookie recipes.  But, truth be told, as much as I would like to, I do not subsist on cookies alone.  Instead, I eat a lot of healthy foods.  The exception seems to be this past week.  As I mentioned, I just got back from a trip to New Orleans, and I'm pretty sure I ate my weight in beignets.  However, it is back to reality.  Which means, it is also back to eating salads and working out.

A while ago, a reader suggested that I share my workout schedule and what better time than when my resolve to get in shape is back in full force.  So, here you have it: some of my favorite healthy dishes and my general workout plan.  :)
I love potatoes!  Eating them with lots of greens is a great way to enjoy something a little less than healthy 
I love this twist on a classic tuna and avocado salad- lots of radishes add a delicious crunch

I try to make sure all of my salads have protein!

My take on a nicoise salad- no sardines because of the sodium, and lots of tomatoes!

I like to workout most days of the week.  I'm not always perfect, but I try to stick with a routine as much as possible.

Mondays: Run.
Tuesdays: Run, weights, hangboard
Wednesdays: Run
Thursdays: Run, weights, hangboard
Fridays: Rock climbing
Saturdays: Yoga (if I can make myself)
Sundays: Rock climbing


On Mondays and Wednesdays, I go for a longer run.  This is usually about 50 minutes, but sometimes I aim for a set distance instead.

On Tuesdays and Thursdays, I go for a shorter run- 20 minutes or so.  Then I do about 30 minutes of weights.  I do both arms and legs and I mix it up between hand weights and a medicine ball.  I love looking on Pinterest for workout moves, and I usually put together some of my favorites from a few different sites.  One of my current favorite moves is using the medicine ball to do offset push ups.  After weights, John and I do a hangboard workout.  Hangboards are a training tool for rock climbing- it's like a pull up bar but with little pockets and slopes to hang onto instead.  It's super hard, but also awesome :)

Fridays and Sundays are my favorites: we rock climb.  We go to a gym called Vertical Endeavors.  It's amazing and tons of fun.  Some days feel terrible, but even the worst days are good days if you love what you're doing!

Saturdays are my nemesis.  It's not that I don't like yoga- I do!  I always feel better after I do it, but it's SO HARD for me to make myself start.

So, what are your favorite (and least favorite!) ways to stay healthy?