Tuesday, March 31, 2015

DIY Easter Egg Wreath

DIY Easter Wreath

It has felt like a long winter, and spring feels like it is finally here!  I love Easter because all the bright colors and flowers seem to go hand in hand with the holiday.
DIY Easter Wreath
To make your own Easter wreath, you will need:
  • Foam wreath
  • Twine
  • Plastic Easter eggs
  • Bright ribbon
  • Embroidery floss

First, tie your twine around the wreath in a knot.  Then, wrap and wrap and wrap and wrap the twine until the whole wreath is covered.  Time consuming, but super simple :)
DIY Easter Wreath
DIY Easter Wreath

Then, thread one egg at a time with a few strands of embroidery floss.  Wrap the string around the wreath and tie it off to secure the egg.  Repeat until you have a series of colorful eggs all in a row.
DIY Easter Wreath

Tie some ribbon at the top, and hang it up to enjoy!
DIY Easter Wreath


Thursday, March 26, 2015

Birthday Bruschetta

Ricotta and radish crostini

Over the weekend, I had a few people over to eat and celebrate turning... older.  John and I made a ton of bruschetta and crostini, and they were all so good that I wanted to share them with you :)
Greek bruschetta

Goat cheese and pistachio crostini

Cream cheese and salmon on triscuits

Creme brulee brie crostini

From top to bottom:

  • Ricotta with mandolin sliced radishes
  • Greek bruschetta: combine one can large olives (drained and sliced) with one can artichoke hearts (drained and sliced) with one chopped tomato and one half cucumber (peeled and sliced).  Add a drizzle of olive oil, and top with feta.
  • Spread goat cheese on toasted French baguettes.  Top with pistachios.
  • Triscuits + salmon + cream cheese = delicious!
  • Creme brulee brie: These were a delicious treat!  Recipe at Cheese Talk 

Not pictured: I have to give a shout out to How Sweet Eats for the amazing whipped feta with tomatoes and basil.  It was delicious!

Tuesday, March 24, 2015

DIY Cupcake Bookmark

DIY Clay Cupcake Bookmark

I think I have a new favorite thing to make: clay bookmarks.  I really liked how my bumble bee turned out last month, so I decided to try and make a cute little cupcake this month.

To make your own, you will need:

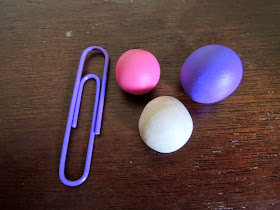
  • Sculpey or other polymer clay in purple, pink, white, and brown
  • Purple paperclip
  • Long pointed metal tool or toothpick
  • Small paring knife

First, and most importantly, massage your clay until it is nice and soft, then form it into a ball.  This helps make it more pliable, but also prevents it from cracking in the oven!
Sculpey clay

Once the clay is soft, take your purple ball of clay and mush it down with your finger to make it cylindrical.  Roll the cylinder on one side to shape it into your cupcake wrapper.  Cut off the narrow end to ensure it is flat.
DIY Clay Cupcake
DIY Clay Cupcake
DIY Clay Cupcake

Use your pointed tool to create indentations up the side of the cupcake wrapper, giving it the accordion pleat texture.
DIY Clay Cupcake
DIY Clay Cupcake
It looks like a purple Reese's peanut butter cup!

Next, take a pinch of your brown and a pinch of the white and mix them together. The goal is to create a nice, tan color.  You can probably buy this shade from a package, but it's a color I just don't use enough to buy a whole brick of it.
how to make tan clay
Sculpey clay

Once you've made your tan, mush it into a dome shape and press this firmly but gently on top of the cupcake wrapper to make your cupcake top.
DIY Clay Cupcake
DIY Clay Cupcake Bookmark

Then, flatten your pink ball of clay into a thick disk.  Lay this on top of the cupcake to create your frosting.
DIY Clay Cupcake Bookmark

Use your pointed tool to press swirls into the frosting, aiming for a peak at the top.
DIY Clay Cupcake Bookmark

Finally, go back to your white clay and roll tiny little balls to create sprinkles for your cupcake.
DIY Clay Cupcake Bookmark

Press your paperclip into the base of the cupcake.  Then, remove the paperclip and bake the cupcake at 275 degrees for 15 minutes.  Use super glue to secure the paperclip in place.
DIY Clay Cupcake Bookmark

I decided on this cupcake because my birthday is coming up :) 

Thursday, March 19, 2015

Birthday Giveaway!


For the past several years, I have hosted a giveaway for my birthday here on the blog.  Well, it's that time of year again!!  My birthday is in a little less than a week, and I am so excited to share the prize this year: Kate Spade's Like a Book insulated tumbler!

I am over the moon for this print.  I have an insulated thermos from Kate Spade that says "Cold Hands, Warm Heart" which I love.  So, when I saw this, I knew I had to spread the love!

Now, I also ordered myself an early birthday gift from Kate Spade- the Go All Out bangle.  They shipped the two together, and I couldn't keep myself from tearing into the packaging.  So, while you won't get the super cute Kate Spade shipping treatment, I promise to send this off to the winner with much love and adornment :)

To enter, all you need to do is like Holly Goes Lightly on Facebook, and leave a comment on this post saying that you did!

Good luck to all- the contest ends on April 2nd!

This contest is now closed

Tuesday, March 17, 2015

DIY Custom Glass Nail File


I love glass nail files.  My mom got me a pair several years ago, and I have been using them ever since- the same pair!  They last forever, you can clean them, and they're better for your nails because they cause less tearing.

My little pair used to have a martini glass on the end, but years of use had worn away the design.  That's when I thought I would paint my own on!  It is so simple to do :)

You will need:

  • A glass nail file, cleaned and wiped dry
  • Martha Stewart glass paint in Garnet Fine Glitter and Green Gold Metallic

Simply draw on a heart in the red glitter paint, and dot on golden polka dots all around it.  I love these Martha Stewart paints because they have a pointed tip at the end.  So, you can squeeze some out on a palette and use a paint brush, or you can just apply directly from the bottle.

Let dry, then admire your new file as you primp and pamper your nails :)

Saturday, March 14, 2015

Saturday Snapshot: Spring has Sprung!

Pretty pink flowers

Oh my goodness, I think spring might finally be here!

Thursday, March 12, 2015

DIY Golden Hangers

DIY golden hangers

By now, if you have been following my blog for any length of time, it should be clear that I love gold spray paint.  It might be an addiction... but essentially nothing in our home is safe if it sits still and is paintable.  Hangers?  No exception.
DIY golden hangers

Buy an eight pack of IKEA hangers and a can of metallic gold spray paint, and you'll have pretty much everything you need for this simple DIY.

Place a plastic baggie over the head of each hanger and tape securely.
DIY golden hangers

Use a box to contain the paint and work through each hanger, rotating and spraying until it is completely covered.  Let dry, and then let them shine in your closet!
DIY golden hangersDIY golden hangersDIY golden hangers
DIY Golden hangers