Saturday, August 30, 2014
Thursday, August 28, 2014
Life Lately
I feel like I keep saying it, but time is flying by! I have been super busy lately getting my classroom ready, doing teacher trainings, packing the house up, and doing projects to get us ready for our move. I wish there were more hours in a day!
No matter how busy I am, though, it seems that I always find time to get out in nature. Nature and dessert. Lots of dessert.
Do you have something that you always make time for?
 |
| Check out all my school supplies! I'm so happy to have all these pencils to give to students :) |
No matter how busy I am, though, it seems that I always find time to get out in nature. Nature and dessert. Lots of dessert.
Do you have something that you always make time for?
Tuesday, August 26, 2014
Teacher Feature: My Classroom
 |
| I have a cute little coat closet that I added a strip of washi tape to for some fun polka dots. |
 |
| I teach English, but I love incorporating art. This hangs above our art supplies (recognize the push pins?) |
 |
| This box was a gift from my sister-in-law. It has hanging file folders that I'll keep past assignments in! |
 |
| Some cute desktop items- I love the blue dish because one of my students made it! I'm using it to hold paper clips. |
Are you heading back to school this year? What memories do you have about your favorite classes?
Saturday, August 23, 2014
Thursday, August 21, 2014
Moving Out: One Last Project
For the last several years, I have posted home improvement projects that John and I have done to our house. We've changed the doors, doorbell, counters, and carpet. We've done all kinds of projects that helped make the house feel more updated and more like our home. Well, this is the last one. In a little bit, John and I will be moving out and into our new home! It's a little bittersweet, but I'm very much looking forward to giving you all a tour of our new place :)
The last project we did at the house turned out to be one of the most exhausting, and we did not expect for it to be. There is a small bathroom in the basement and it had some pretty ugly wallpaper. The loon is Minnesota's state bird, but I'm not sure I need to shower with them... Well, the wallpaper was NOT going to let go without a fight. We used fabric softener, water, steam, and scrapers to finally peel all of it away. It took well over 12 hours, and (as a side note) if you use the fabric softener method yourself, be prepared for it to wreck your nails! It wasn't cute. But it was worth it. We painted it the same smokey blue that is in the upstairs bathroom. I love how it looks with the basement tile!
 |
| Before... it's certainly not the worst bathroom ever, but it could be better. |
 |
| FINALLY all the wallpaper is removed |
 |
| After; I really like this color! |
So, with the worst/most difficult project to date, I am prepared to say goodbye to this house and hello to our new one :)
Tuesday, August 19, 2014
Oven "Fried" Zucchini
Here is another Granny recipe for you! These are SO easy to make and absolutely delicious. Try adding some parmesan for a little twist...
You will need:
- 1/2 cup corn meal
- 1/2 teaspoon salt
- 1/4 teaspoon pepper
- 1/4 cup egg substitute (I used one egg instead)
- 1 tablespoon water
- 3 medium zucchini, sliced 1/4 inch thickness
- Cooking spray
Mix the corn meal, salt, and pepper. In a separate bowl, combine the egg and water and beat well. Dip each zucchini slice into the egg, then into the corn meal.
Place the zucchini onto a baking sheet, lightly sprayed with cooking spray.
Bake at 450 degrees for 30-40 minutes until the zucchini is golden brown. Enjoy!
Saturday, August 16, 2014
Saturday Snapshot: Glass Sculptures
This week, I made a visit to the Minnesota Landscape Arboretum. I love visiting this place- it is full of sprawling gardens, and things are constantly changing. One newer addition was glass sculptures on the grounds. They were so neat and the arboretum did a great job incorporating them into the surroundings.
Thursday, August 14, 2014
Coconut Dreams
I've got another recipe from my granny's recipe box to share with you all today: Coconut Dreams! Typically, my granny's dessert recipes are not very sweet, but these are an exception to the rule. They are ooey gooey and deliciously sweet! I completely forgot to take a picture of them after I cut them, and then, well, we ate them up so quick that by the time I remembered to they were gone :)
You will need:
- 1 cup flour
- 3 tablespoons brown sugar
- 1/2 cup butter
- 1 1/2 cup brown sugar
- 3 eggs
- 1/2 cup coconut
- 1/2 cup nuts
- 4 tablespoons flour
- 1/2 teaspoon baking powder
Combine the first three ingredients on the list (1 cup flour, 3 tablespoons brown sugar, 1/2 cup butter) and mix well. Place in a 9x9 pan and bake for 10 minutes at 350 degrees. Side note: I have no idea if you are supposed to just put this in a pan or press it into a pan. I went with press, but who knows! That's the wonder of Granny recipes :)
While this is baking, beat your three eggs well. Then, mix in the remaining ingredients.
Pour this mixture over the rest and bake for half an hour. Let cool, then cut into squares and serve. Enjoy!
Tuesday, August 12, 2014
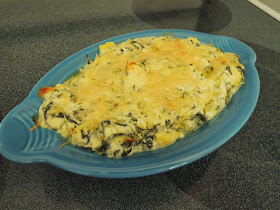
Beg, Borrow, Steal: Spinach Artichoke Dip
Oh man, this recipe was too good to keep to myself! I found it on Pinterest (of course!), and Natasha's Kitchen has the full recipe for this delicious and not-too-bad-for-you dip.
I followed the directions as instructed, but decided that when the dip was done, it would be nice to finish it off under the broiler. So, I spooned some into an individual casserole dish, topped with parmesan, and broiled at 450 for about 5 more minutes.
Yum! You seriously need to try this!
Saturday, August 9, 2014
Saturday Snapshot: Purple Orchid
Last week, I shared a bunch of orchid photos with you, but I felt like this one deserved its own post. Isn't it beautiful?
Thursday, August 7, 2014
File Cabinet Makeover
Last year, I redid a file cabinet for my new office upstairs. It turned out great, but as we get ready for the move, we are getting rid of things we just don't need anymore. The file cabinet and matching bookshelf fell into that category. So, that left us with our old metal filing cabinet. It's fine, but not especially pretty. So, I decided to take a page from CB2 and turn it into a brightly colored piece for our new home!
You will need:
- Spray paint (make sure it is specifically designed to adhere to metal surfaces)
- Sandpaper
- Damp washcloth
- Painter's tape
When you pick your paint, there are a few things to consider. One, be sure to get a paint that is designed for your specific material. Two, pick a color that will pop against its surroundings. Three, consider the finish- there is matte, satin, and gloss typically available in spray paints. Gloss looks sleek, but tends to show errors more. Since I tend to goof up, I picked a satin finish instead in a lemongrass color that I thought would look great with the black and white office rug.
Set up an area to work outside on a pleasant, but not too humid day. If it's too humid, your paint won't dry properly.
Give your file cabinet a good sanding, paying special attention to any spots that have started to rust. Wipe it down with your damp cloth after you are finished sanding and allow to dry completely.
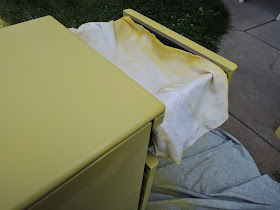
Use your painter's tape to cover up any areas that you do not want getting painted. For larger areas, you can use a combination of tape and paper or cardboard, or use an old rag to drape the places you want left unpainted.
Then, simply spray paint the file cabinet! You want to do this in at least two coats, otherwise you will glob on too much paint and it will come out a mess. If you do get overzealous with the spray paint and notice drips, don't stress. Just let them dry completely, sand, and respray.
 |
| After your first coat, it's okay for the coverage to be splotchy |
 |
| I went a little over board with the paint and got some drips- I can sand these off and repaint once it is dry |
I think this turned out really great! I'm very excited to use it in our new home... and I'm even more excited to share those pictures with you!!


.jpg)


