Tuesday, April 29, 2014

Life Lately

Snuggles with Inga, Easter egg dying, and my new betta!
Mercifully, April was a far less eventful month than March.  No car accidents, no major turns of a decade... all in all a good month! ;)

We saw winter finally turn to spring here in Minnesota.  One fun thing that happens this time of the year is that loons stop by our lakes for a bit.  They are so neat!!  I hear them calling on my walks with Inga.  I also decided to start trying one new dinner recipe each week from one of our cookbooks.  So far, the results have been great.
Winter one day, spring the next!  So happy the snow is gone!
Walnut lentil burgers
Chicken roulades with glazed carrots
Pork tenderloin with lemon and shallot green beans
Chicken in mustard sauce with beets and goat cheese

What were you up to this month?  Anything new and exciting?

Thursday, April 24, 2014

Granny's Banana Bread


Yum!  I love banana bread.  Well, I love any bread to be honest :)  This is a pretty easy recipe, though I might recommend baking it at a lower temperature than recommended for a longer period of time.  I found the ends of my bread were a little dry while the center was just slightly under-baked.

You will need:
  • 2 cups flour
  • 1 teaspoon baking powder
  • 1/2 teaspoon baking soda
  • 1 teaspoon salt
  • 1/2 cup shortening
  • 1 cup sugar
  • 2 eggs
  • 1 cup banana (I used 2 large bananas)
  • Optional: 1/2 cup nuts (I used 1/2 cup semi-sweet chocolate chips instead!)
Combine everything except the flour and nuts (or chocolate chips) and beat well.  Add the flour and then the nuts or chocolate.

Put in a loaf pan and let it rest for 20 minutes, then bake at 350 degrees for 60-70 minutes (again, I might suggest a lower temperature for a longer time).

Yum!!

Tuesday, April 22, 2014

Sharpie Easter Eggs


This Easter, like every year, we went to my parents' house to dye eggs the day before Easter.  Every year, I try and come up with a new way to decorate my eggs, and this year I decided to give Sharpie markers a try!

Super simple- just grab your favorite colors of Sharpie markers and go to town once your eggs are colored and dry.  I found that the silver and black worked best, but I did a few eggs with copper and gold metallic Sharpie as well.
Eggcellent.... ;)

Did you dye eggs this year?  What are your Easter traditions?  I hope you had a happy holiday!

Finally, I want to also announce my giveaway winners!  Congrats to Amy and Dani!  Amy, you will get to pick your package because your name was pulled first.  Dani, you will win the remaining kit!  :)

Thursday, April 17, 2014

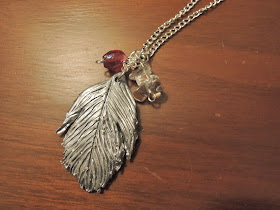
DIY Feather Necklace


Okay, I love how this turned out.  I have been wanting to try making charms out of clay and painting them to appear metallic for a while, and it worked pretty well!  The bonus is that it is much lighter than a metal charm.

You will need:

  • Polymer clay
  • Silver metallic spray paint
  • Pointed tool
  • Jump ring
  • Silver chain

Knead your clay until it is soft, then form it into a flattened football shape.

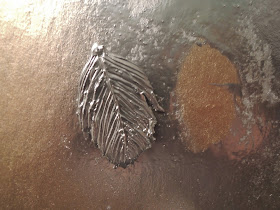
With your pointed tool, draw a line down the center of the feather.  Then, add some veins onto the feather.  These definitely don't need to be perfect!  Also, use the tool to push all the way through the feather in a few places.

Next, use your pointed tool to pierce through a hole at the top of the feather.  This is for the jump ring after you bake it.  Bake according to package directions- likely 275 degrees for 15 minutes for every quarter inch of thickness.

Once the feather is baked and completely cool, spray it with your silver spray paint.  Let the first side dry, then flip it over and spray the other side.  Add your jump ring to the feather and put it on your chain.  I also added a few little charms.

Now, don't you forget to enter my little giveaway!  There's only a few days left, and chances are VERY good that you could be a winner!!

Tuesday, April 15, 2014

DIY Clay Bunny


Here comes Peter Cottontail.... Easter's on its way!  And this cute little bunny is a cute little addition to your spring decorations.  Plus, he's super easy to make!

You will need:

  • Polymer clay (I chose pale pink, white, and black)
  • Toothpick or other small pointed tool

Take your pale pink clay and massage it until it is soft.  Then, form it into a soft cone about the size of your thumb.

Take your pointed tool and smoosh the top of the soft cone down the middle.

Gently pinch the two sides upward to form long bunny ears.

Now it's time to add some detail.  Use your white clay and form a smooshed oval.  Apply it to what will be the belly of your bunny, and remove the excess.

Next, form two small balls with the white clay.  Place these just above the belly and press them gently into the bunny.

Make an even smaller pale pink ball and press this in between the two white balls to form the nose of your bunny.

Add  a small white ball for a tail and two tiny black balls for eyes.  Finally, use your pointed tool to press indents along the insides of the ears.

Then, simply bake at 275 degrees F for 15 minutes.  Too cute!

How do you get your home ready for Easter?

Thursday, April 10, 2014

DIY Vintage Button Push Pins


As I look toward becoming a teacher, suddenly every thought has become "that would be cute/useful/fun to have in a classroom!"  And these cute little push pins are no exception :)

You will need:

  • Push pins
  • Buttons
  • Hot glue gun, high setting

Now, I am partial to the vintage looking metal buttons, but I think this would look really cute with pearl buttons, too.

Pick out your buttons and lay them out, face down.  Then simply add a dollop of hot glue and press the pin into place.  That's it!  You're done!  Totally doable :)