Monday, October 31, 2011

Happy Halloween!

We went over to friend's on Friday for dinner and pumpkin carving.  It was delicious and the pumpkins turned out pretty good, too!

Saturday was our proper Halloween- costumes and all.  I also made some yummy pumpkin cupcakes with this recipe from Real Simple.
Me and Frankie

Trick or treat!

I hope you have a spooktacular Halloween!!

Friday, October 28, 2011

Breakfast Bacon Bowls

Amazingly delicious.  I saw these bacon bowls on Pinterest and I've been dying to try them ever since.

Preheat the oven to 350.  While the oven is heating, make your bacon bowls.  Each of my bowls was made of two pieces of bacon.  Cut one strip in half and lay them crossed over the back of the muffin tin.  Then, take one piece of bacon and weave it basket style around the sides of the muffin cup.  I tried two with tin foil and two on the bare nonstick tin.  I think the foil worked out better- it had less shrinking when the bacon cooked.

While the bacon is baking, make your egg scramble.  I chopped up some peppers and mushrooms and sauteed them.

Then I added in the eggs and by the time they were done, I took the bacon bowls out of the oven.  John and I like our bacon a little floppy, but the bowls still held their shape well!  If they had baked for just a little bit longer though they would have been easier to cut through. 

We topped off our eggs and veggies with some feta cheese from the Midtown market.  Delicious!

Just in time for a lazy Saturday morning :)

Wednesday, October 26, 2011

Autumn Entryway

It is that time of year when the frost starts to set in.  Our begonias have been blighted by the cold, our potted plants put to rest.  In their absence, the entry to our house looked completely bare.  So, with fall on our minds and pumpkin carving in the near future, John and I set off to Home Depot to deck out our newly emptied steps.  Here are the before and after shots:
Our spring pots- they got to be VERY big and pretty. 
Definitely going to use lobelia and geraniums next year!
I'm excited to carve these pumpkins and maybe get some corn to hang on the door too.
The squirrels have already discovered our corn stalks.  We heard them thumping around on the front steps trying to get their paws on it and I managed to snap this picture:
Hello, new friend!
They've even started munching on our pumpkins... At least wait until we've carved them!

Monday, October 24, 2011

Sea Salted Caramel

I've been on a cooking kick lately, what can I say?  And the great apples still in the store were just asking for a caramel sauce for them to take a dip in.  The lovely blog Ruffled Sunshine provides a great recipe (and a super cute printable!) that I decided to give a whirl.

You will need:
3/4 cup of heavy cream
.44 cup of sugar (Thanks to John, I now know that this is 1/3 of a cup plus 5 teaspoons)
3 Tablespoons of butter, chopped up
and some sea salt, just a bit

Of course, I never have everything I need for a recipe even when I go to the store specifically for recipe ingredients.  So, I used some kosher salt instead and it was just fine!

Here is what you do:

First, you pour the heavy cream into a sauce pot and heat it up over low heat.  While it's heating, put the sugar into a heavy duty sauce pot and heat it over medium heat.
Heavy cream, low heat
Sugar, medium heat
Here's where it is important to read ahead.  *Don't stir the sugar!*  It was so hard for me to leave it alone, but resist!  When the melted sugar turns amber, give the pot a few gentle swirls and remove it from the heat.
Too soon!  Don't swirl yet!
NOW you can swirl! 

Then, add in your chopped butter to the sugar and place it back on the heat

This is the stirring part.  Add in the heavy cream slowly as well along with a pinch of salt.  Let it boil for a couple of minutes and then take it off the heat.  Let it cool, and then pour it into a container.

I was amazed at how easy it is to make!  Homemade caramel in a matter of minutes.  I think sometime soon I'll dig up my grandparent's recipe for caramel corn.  Yum! :)

We had some old mason jars in the basement, so I used one of them (small sized) as my caramel container.  However, I had to make two batches to come close to filling the jar.

If I had a color printer, I would have used Ruffled Sunshine's adorable printables.  How cute would they be printed onto stickers!?

Friday, October 21, 2011

Jaded


As I mentioned in an earlier post, my great grandmother was a woman of many talents and is a source of inspiration to me.  While going through a box of old things, I ran across a bag of jade beads that used to belong to her.  I had long ago decided to restring the beads, but I hadn't had a good idea for how exactly to string them until recently.

I wanted to make a necklace that used ribbon, and I found some gorgeous purple velvet ribbon at Joann Fabrics.

To string the beads, I used a silk thread.  In hindsight, I think I should have gotten a colored thread that would have blended in a bit bitter...

Basically,  I cut two strips of the velvet ribbon about two feet in length each.  Then I looped the string around the center of one velvet ribbon and tied a knot.  Next, I threaded one bead at a time onto the silk thread, tying a knot after each one like an old fashioned pearl necklace.  Once the beaded portion was as long as I wanted, I secured the thread to the center of the other ribbon.  Voila!

I'm happy with the result and I love the fact that it's adjustable (and super easy to make!)

Wednesday, October 19, 2011

Healthy Pizza!


So, there are a bunch of recipes floating around on Pinterest for cauliflower crust pizzas.  It sounded too interesting not to try, so last night John and I tried this recipe out for ourselves.  We had both had big lunches that day, so the smallish sized pizza (9 inches) was a great size for a lighter supper.  We even had a little leftover!  Okay, no we didn't.  :)  It was too tasty not to eat the whole thing!

For the crust you will need:
1 head of cauliflower
1 egg (beaten)
1 cup of mozzarella
and a dash of oregano (I chose to omit the garlic)

Preheat the oven to 450 degrees.  While the oven is heating, you will need to rice the cauliflower, which I did in our FOOD PROCESSOR!  (Basically, use the pulse setting to shred it into grain-like pieces)  I'm so happy we have one!
 

Once you rice the cauliflower, pour it into a bowl and microwave it all for 8 minutes.  Then, scoop out one cup and put the rest in fridge for making more later (trust me, you'll want to!).  Put your one cup of cauliflower into a bowl and add the beaten egg, the cheese, and oregano and stir together.  Grease a pan (I might even use parchment paper next time) and pat the "dough" into a 9 inch round.
Pop it in the oven for about 15 minutes.  While it's baking, cook the toppings you plan to use.  We chose mushrooms and spinach, my personal favorite.  I brazenly disregarded Julia Childs' advice and crowded my mushrooms into a tiny pan and topped it off with spinach.
 

Once the crust is done, spoon on some sauce (we used Prego) and put on the toppings.  Then heat it under the broiler until the cheese begins to brown.
I think this would be great by itself in little cookie sized portions!


It's definitely an eat-with-a-fork type of pizza, but it was so good!  I hope you try it too!

Big thanks to Eat Drink Smile for the great idea!

Monday, October 17, 2011

Grown Up Grilled Cheese


Apple and brie sandwiched together on some toasty bread, need I say more?  Well... I'll say just a bit more. :)

I got the idea, as usual, off Pinterest.  And it looked so tasty, I just had to try it.  I decided to nix the apple butter from the original post and instead just layered brie with apple in the sandwich.  I used three layers total (brie, apple, brie) and buttered the outsides of the bread.

A few minutes on the griddle and our sandwiches were done- yum!  We just used the bread we had in the house, but I think it would be really delicious with some fresh crusty bread.  Mmmm....

Friday, October 14, 2011

Brussel Sprouts

At a recent wedding, I ate some amazing brussel sprouts!  They were caramelized with walnuts and gorgonzola cheese.  They were so yummy that I decided to try my own version of them last night.

I roasted the brussel sprouts:
Toss them in olive oil and cut little tiny crosses in the stalk so that the heat reaches the core
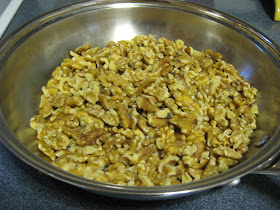
And I toasted the walnuts:
I sauteed them to achieve the same effect, just until the nutty scent was released
Once they were both done, I tossed them together and topped with gorgonzola
If you're wanting to try this recipe, I would do a few things differently.  First, I would cut the brussel sprouts in half before cooking.  Second, I think I would opt for steaming the brussel sprouts first so they're nice and tender, then finish them off in the oven.  All in all, it's a tasty combination!

Wednesday, October 12, 2011

Bacon and Squash Pasta


Have I mentioned how much I love fall food? ;)  Well, the other night I decided to rev up our spaghetti with a fall favorite: butternut squash.  And since everything is better with bacon, I added that in as well!  This was a delicious dinner and it's really easy to make.

What you'll need for two hungry people:
Spaghetti (about half of one box... maybe a little more)
1/2 of a large butternut squash, chopped into small pieces
1 sweet yellow onion, chopped
4 slices thick cut bacon, cut into 1/2 inch pieces
olive oil

Combine the bacon, squash, and onion in a pan and toss with olive oil.

Roast until the veggies are tender and the bacon is a little crispy. (about 20-30 minutes at 400)
While the vegetables and bacon are roasting, make the pasta.  I used spaghetti, but you could really use whatever pasta you'd like.  Drain the pasta and set aside.  Once the food is roasted, add the pasta back into the pot and toss with the roasted vegetables and bacon.  And of course, add some fresh parmesan to top off the dish.  Delish!